Turn Tiles into a 3D Fish Tank Background - Lifehacker
Turn Tiles into a 3D Fish Tank Background - Lifehacker |
| Turn Tiles into a 3D Fish Tank Background - Lifehacker Posted: 02 Jan 2010 12:00 AM PST 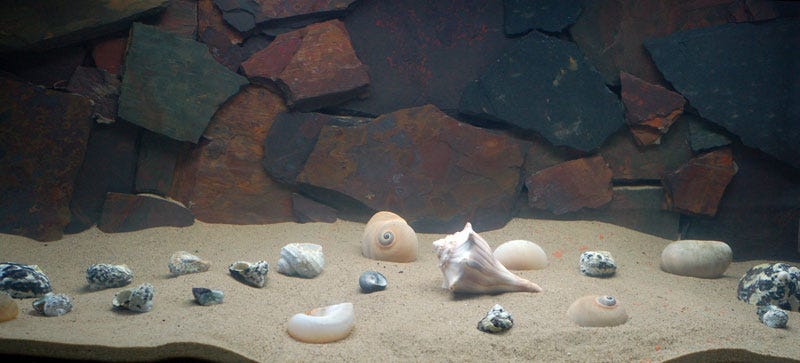 If you're bored with the plain background of your fish tank, you can add a 3D background inexpensively with this simple guide. You can find rolls of fish tank backgrounds at nearly any fish store, but they lack sorely for realism and look like what they are—flat and static photographs. You can make a 3D background that will add a significant amount of realism and texture to your fish tank with little expense and only about an hour of work. My total cost for the project was $10 for a box of slate tile from the clearance bin and $3 for some silicone. You'll need some basic supplies and tools including a hammer, a screw driver or chisel, and a caulk gun. On the supplies side of things you'll need a tube of silicone caulk and a box of slate floor tiles. Make sure you buy silicone caulk without any additives. If you want to be extra cautious you can buy only from a fish store, but I've been buying silicone caulk from the hardware store for years without any problem—just make sure you read the label carefully and buy silicone that doesn't have any fungicide or other additives, GE Silicone 1 for Doors and Windows is the brand I've always used. Advertisement  The first step is the fun one. Take your box of floor tiles and bust them up with a hammer—wear safety goggles! How you break them will be determined by your tank size and the look you're going for. If you want a big chunky background then break them into large pieces and leave them that way. If you want a background with smaller pieces, then smash them accordingly. G/O Media may get a commission Once you've broken the tiles, look through the pile of pieces for corner and edge pieces. You'll want four good corners and a fair number of pieces that have a straight edge on them. These pieces will be the corner and edges of your background respectively. The rest of the edge pieces will need to be chipped with the hammer to break up the straight lines for a more natural look. Slate "naps" pretty easily, so you can hit just the very edge and it will chip away in an irregular pattern.  Advertisement After you've finished breaking up and sorting the slate tile it's time to start building the background. Lay the fish tank on its side. I put my tank on a piece of styrofoam but you could put it on a carpet scrap, old comforter, or any other soft surface. Lay out the first layer of the background on the glass. Place the corners and edge pieces, then place pieces in the middle trying to leave as little space in between them as possible. Don't stress about a jig-saw-perfect fit because the second layer is going to cover up all the gaps.  Advertisement When you've laid out all the pieces to your satisfaction, start applying a liberal amount of caulk to the back of each piece and pressing it firmly into place. You'll want to put the heaviest amount of caulk in the center of the piece so that it'll spread out under the slate without spilling out over the edges. You can opt to leave the first layer to set for a few hours or if you're careful and you can move right onto the second layer. You're going to repeat the process of laying out the tile pieces and securing them with silicone, this time with a focus on covering up the seams or gaps in the first layer.  Advertisement After the second layer is down and you've pressed everything firmly into place, leave it alone for at least 24-48 hours to cure. The silicone will release acetic acid as it cures, so when the background stops smelling strongly of vinegar you know it has cured enough. You can't go wrong waiting an extra day or two at this step; many aquarium enthusiasts will let silicone cure for upwards of a week before doing anything else with a tank. It's worth noting that although I started with an empty and dry fish tank it is possible do to this project with an already established fish tank. Instead of adhering the tile directly to the back of the fish tank you'll simply adhere the tile to a piece of acrylic sheeting cut to fit inside the tank and then slowly and carefully lower the background into the established tank and lean it against the back. Advertisement A guide to building a fish tank background wouldn't be complete without a picture of the fish that ended up in the tank:  Advertisement The 20 gallon long went in my office and now houses four Neolamprologus Brevis, a shell-dwelling Cichlid from Lake Tanganyika in Africa. The male fish seen in the photo above has taken a particular interest in my computer and will swim to the corner of the tank and stare at the monitors every time I sit down to work. Have your own DIY pet-related project to share? Let's hear about it in the comments. Advertisement |
| You are subscribed to email updates from "3d aquarium backgrounds" - Google News. To stop receiving these emails, you may unsubscribe now. | Email delivery powered by Google |
| Google, 1600 Amphitheatre Parkway, Mountain View, CA 94043, United States | |


Comments
Post a Comment