Creating DIY Aquarium Lighting With Arduino - MUO - MakeUseOf
Aquarium plants need light to create energy via photosynthesis, while many fish benefit from a regular light cycle, but how can you provide artificial lighting for them with the DIY electronics tools you already have? Let's build a DIY aquarium lighting system using an Arduino, real-time clock, and LED strip.
Using an LED Aquarium Light

Before we get started, it is worth noting that the LEDs we're using in this project are not full-spectrum LEDs that mimic daylight. This means that they don't provide all the light wavelengths that are beneficial to plants, rendering them unsuitable for aquarium plants with heavy light needs and wasting a small amount of the energy produced by the LEDs.
That said, for planted aquariums with low light requirements, LED lighting like this can be an excellent choice that offers faster and healthier plant growth without the cost that comes with many aquarium lighting products; you just won't get the same wattage.
It isn't just the plants in your aquarium that benefit from LED lighting: many fish species enjoy a regular light cycle that imitates day and night to preserve their circadian rhythm, enabling them to rest, look for food, and be active as they would be in the wild.
To build an LED lighting system that powers a day-night cycle for the fish and plants in your aquarium, we will be using an Arduino, a real-time clock (RTC), and an LED strip—as can be used for a wide variety of Arduino LED lighting projects.
What Do You Need?
.jpg)
You only need a handful of parts to complete this build:
- 1x Arduino microcontroller with SDA/SCL pins (Uno, Leonardo, Micro, etc.; we are using a Pro Micro)
- 1x DS3231 RTC module
- 1x WS2812/WS2812B NeoPixel RGB LED strip with IP65 rating or higher (we are using a 60 LED 1-meter WS2812 strip that has been sealed with silicon; you may benefit from using more LEDs if you have a 20+ gallon tank)
- 1x 12v AC to DC power adapter with female barrel connector
- 1x 1000uF capacitor (optional)
- Assorted wires and heat shrink pieces
- Superglue/double-sided tape
- 3D printer filament (optional)
You will also need some tools to complete this project.
- A soldering iron
- Wire cutters/strippers
- A heat gun
- A 3D printer (optional)
Wiring Your DIY Aquarium LED Light Setup
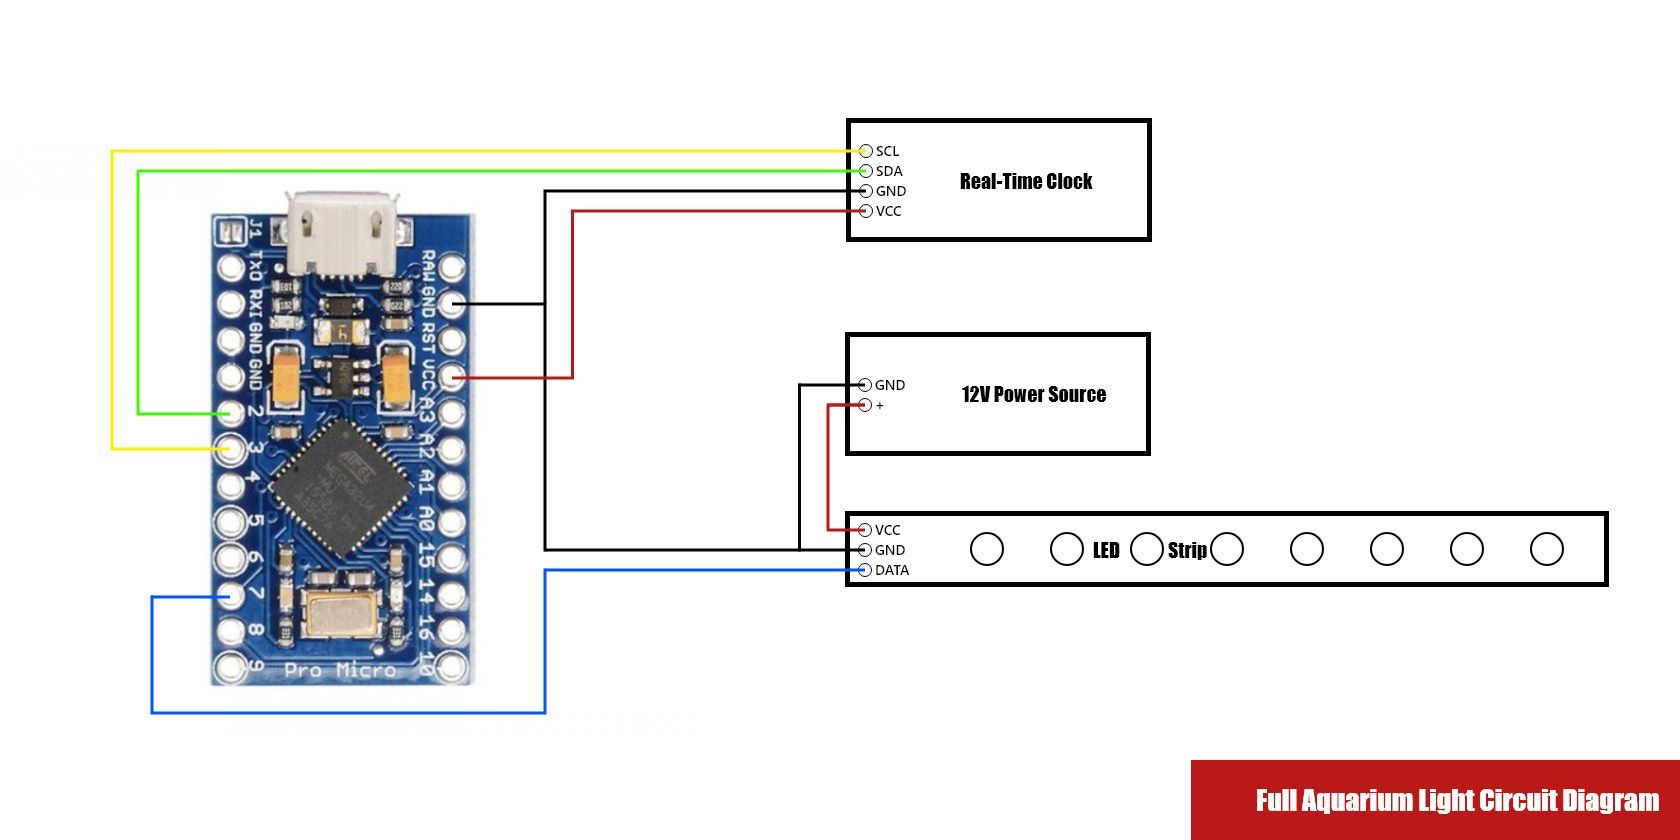
Wiring up your DIY aquarium lighting is simple, with just a few connections to make before you can get started with coding your project. The diagram above shows all the connections you need to make, but we have broken this down in the sections below.
Wiring the Real-Time Clock
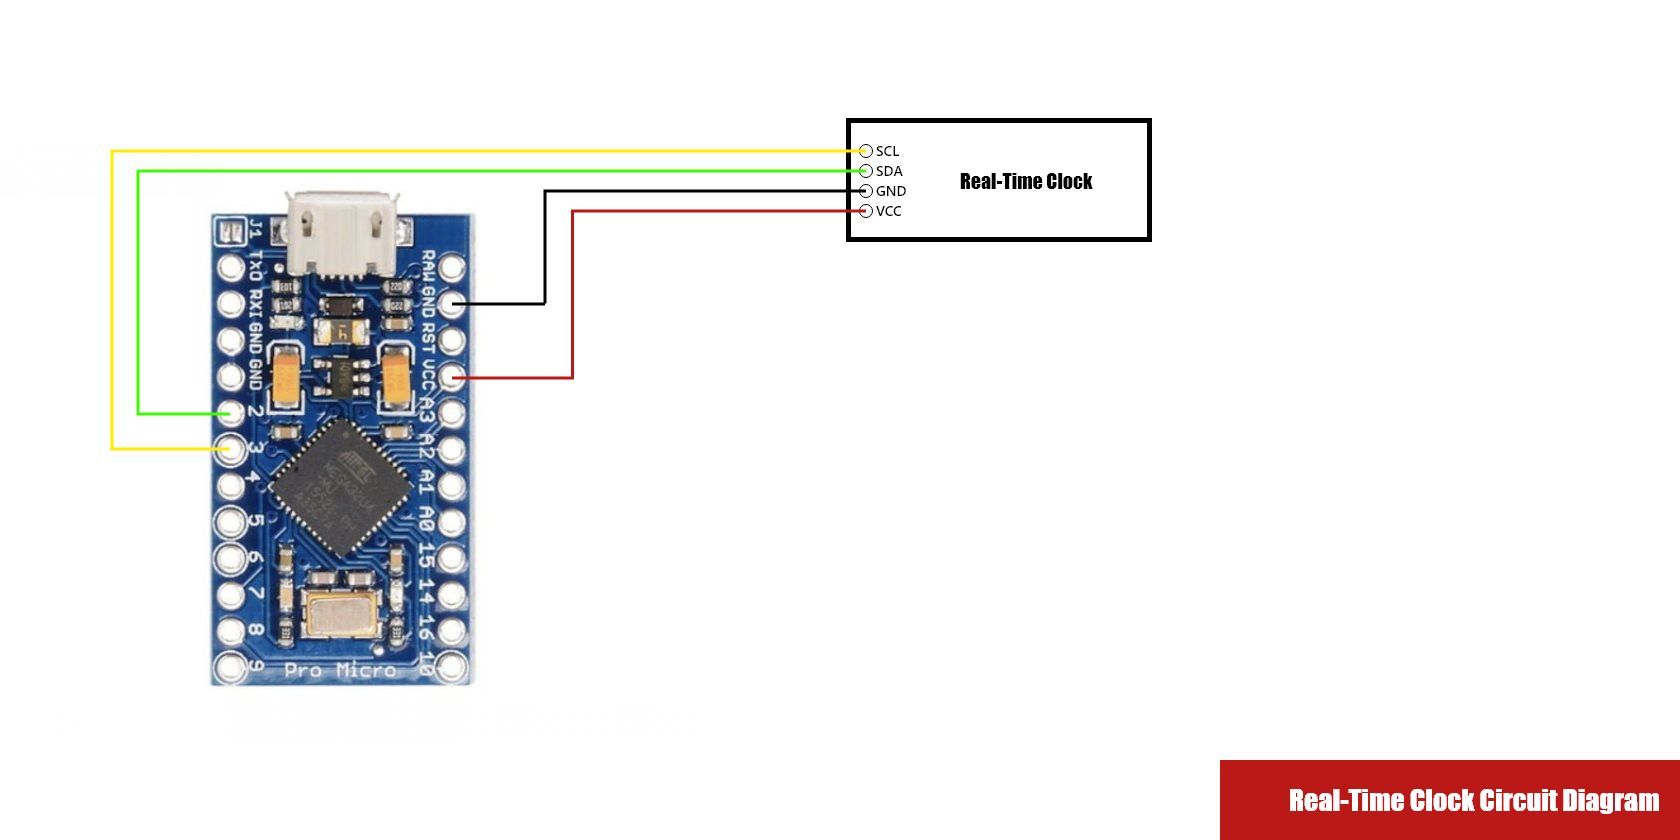
The DS3231 RTC in this project acts as a timer for the LED lighting in our aquarium. This module has four pins that we will be using: SCL, SDA, VCC, and GND, all of which can be directly wired to our Arduino Pro Micro.
- SCL to 3 on Arduino
- SDA to 2 on Arduino
- VCC to 5V on Arduino
- GND to GND on Arduino
Wiring the LED Strip
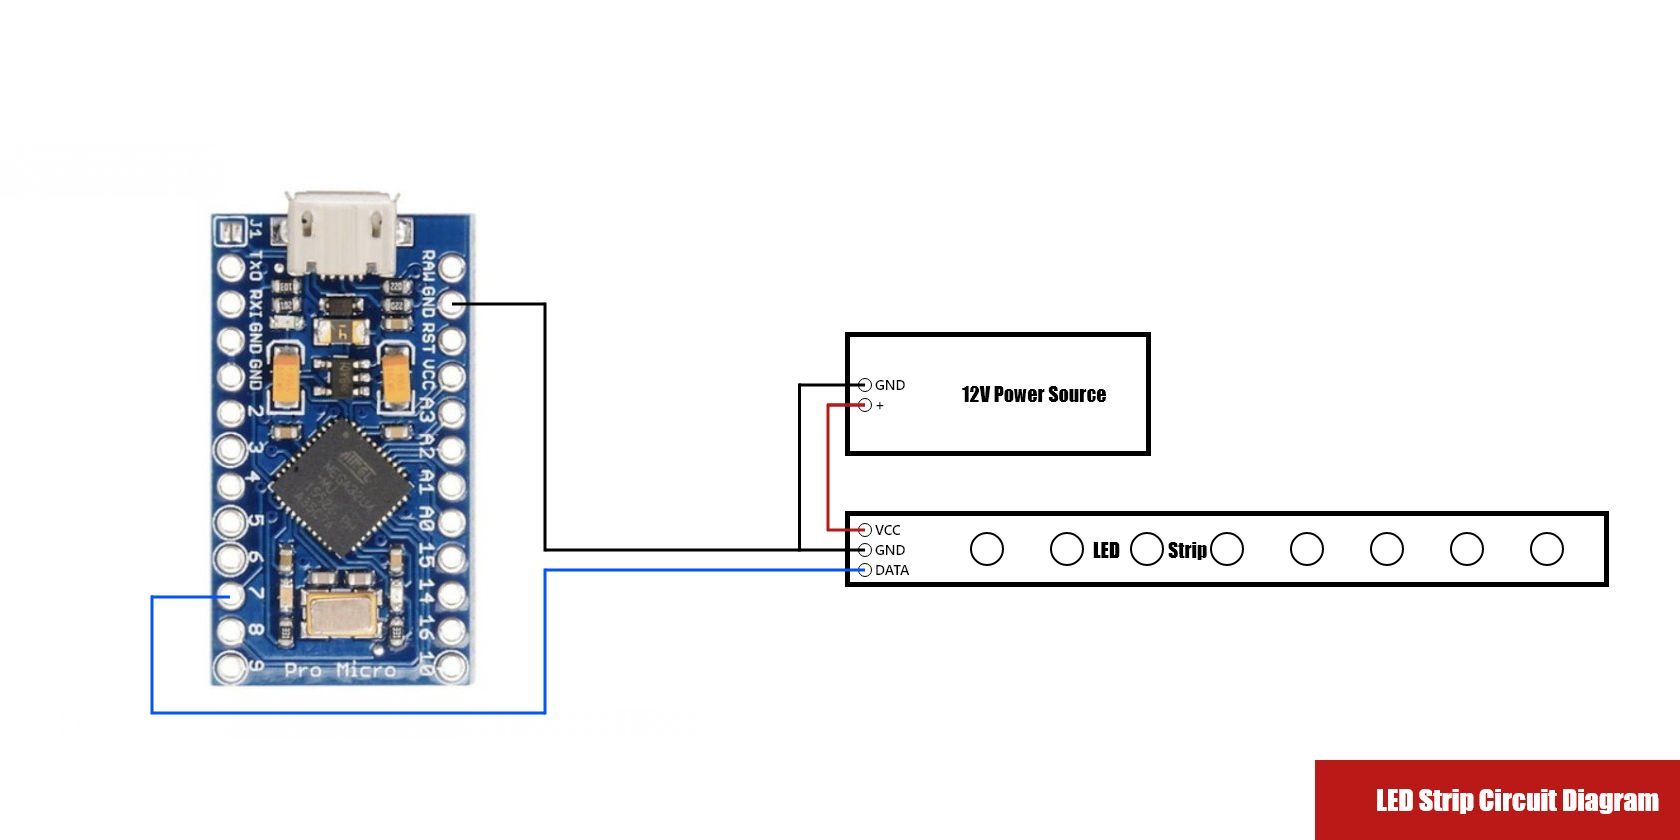
Wiring your LED strip is more complicated than the RTC, as the LEDs are likely to be some distance from the Arduino and you need to use a separate power adapter to get the full brightness from your LEDs. The diagram above shows how you can connect your LED NeoPixel strip to your Arduino and power source for the best results.
- DIN to Digital Pin 7 on Arduino
- GND to GND on Arduino and Negative (-) Power Source Terminal
- VCC/5V+/12V to Positive (+) Power Source Terminal
- It is highly recommended that you use a 1000uF capacitor across the Negative (-) and Positive (+) Power Source Terminals to prevent damage to your LEDs
Alongside connecting our LED strip to our Arduino and 12V power source, we will also be modifying our NeoPixel clone to create three smaller LED strips that will be connected in a chain with a long cable. We will be using an insulated triple-core cable for this, along with heat shrink to seal up the joints. Our LED strip came with JST connectors on each end, providing us with a convenient way to make it possible to detach the strip from our Arduino.
Coding Your DIY Arduino Aquarium NeoPixel Lights
The coding element of this project is more complicated than the wiring. You can start with a basic empty Arduino project, as we won't need anything outside of the functions that come with it.
Adding the Libraries
Before adding any code, we need to install some libraries, and all of these can be found within the Arduino IDE Library Manager.
- Wire.h: This library comes with the Arduino IDE and allows you to communicate with I2C components, like our RTC.
- Adafruit_NeoPixel.h: This library adds functions/classes to control NeoPixel LEDs, but it works just as well with our regular WS2812 LED strip.
- RTClib.h: This library enables us to control our DS3231 RTC module.
#include <Adafruit_NeoPixel.h> //LED Strip library
#include <Wire.h>
#include <RTClib.h> //RTC Library
Adding Global Variables (Optional)
We've added global variables to our code so that we can change the behavior of our lighting with buttons and other inputs in future projects. This isn't essential, but it will make it easier to edit your code when you need to make changes. We added variables for LED brightness and hue, along with a variable to store the color of our LED strip.
Declaring & Initializing LED Strip/RTC Objects
Next, we need to declare our LED strip and RTC as objects that can be used by our Arduino, followed by initializing them within our setup loop.
Our LED strips can be declared by first defining the pin being used and setting the number of LEDs on the strip, but then you can use the lines below to make the declaration itself.
#define LED_PIN 7 // Sets our LED strip to pin 7
#define LED_COUNT 60 // Sets the NeoPixel LED count
Adafruit_NeoPixel strip(LED_COUNT, LED_PIN, NEO_GRB + NEO_KHZ800); //Declares our LED strip object
The RTC is easier to declare, and you only need to use the line below to get it running; all the important settings are applied by default.
RTC_DS3231 rtc;Once this is complete, we just need to initialize our RTC using the following code in our setup class.
 Serial.begin(57600); //Begins our serial connection#ifndef ESP8266
while (!Serial); // Wait for serial port to connect


Comments
Post a Comment